Applying Steri-Strips seems simple, but many people struggle to use them effectively. Incorrect application can lead to poor wound healing, infection, or the strips falling off prematurely. This often leaves individuals frustrated, especially when the wound reopens, requiring them to seek medical attention for further treatment.
One fact that surprises many is that Steri-Strips can actually replace stitches for small cuts. When applied properly, they promote healing by holding the skin together, which can prevent scarring and infection.
In this guide, you’ll learn how to use Steri-Strips the right way. We’ll cover the exact steps to ensure your wound heals safely and effectively. Whether it’s keeping the strips in place or removing them at the right time, we’ve got you covered.
What Are Steri-Strips?
Steri-Strips are adhesive wound closure strips designed to hold the edges of small cuts or surgical incisions together during the healing process. They offer a non-invasive alternative to stitches and staples, especially for minor wounds.
Steri-Strips help minimize scarring and are easier to manage than traditional bandages, making them a convenient option for many patients. They are commonly used in medical settings for small lacerations and as an alternative to butterfly stitches after certain surgeries.
How To Apply Steri-Strips:
1. Clean and dry the gauze stuck to wound and at least two inches around the wound to limit the risk of infection as well as guarantee a good adhesion.
2. Open the package for the Steri-Strips, which are often referred to as sticky strips. Remove the strip card and card end tab.
3. Grab the end of the Steri-Strip and lift it upward, away from the card.
4. Push the wound edges together with your fingers and place the Steri-Strip across the wound. Press down firmly on the sticky strips to keep them in place.
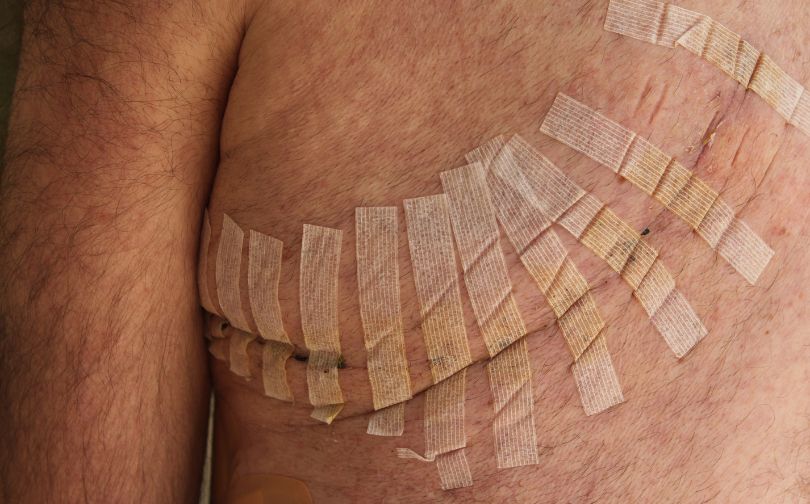
5. Add more Steri-Strips across the wound, approximately one-eighth of an inch apart, until the wound is completely closed.
6. Align additional strips parallel to the wound, approximately one-half of an inch from strip ends, to prevent premature lifting of the strips.
Cleaning the area around the wound is just as important as cleaning the wound itself when utilizing Steri-Strips. Skin needs to be free of oil and moisture to ensure good adhesion of the strips. Also, don’t pull skin too tight when applying Steri-Strips. If the skin is pulled too tight, the skin can blister or the strips may lose adhesion to your skin prematurely.
How Long Should Steri-Strips Remain Applied?
Steri-Strips should typically stay on for 7 to 14 days, depending on the side of the wound and its location. Wounds on the face or neck generally require 5 to 7 days, while those on the body or limbs can take up to 14 days. The strips are designed to fall off naturally, but if they remain after two weeks, you can carefully remove them. If the edges start curling, trimming with scissors is a better option than peeling them off.
Removing Steri-Strips
1. Check to see if the ends of the Steri-Strips have begun to loosen. You may need to use tweezers to gently remove the Steri-Strips when the time comes.
2. If the strips seem to be stuck tightly, soak the area in water prior to trying to remove them.
3. Pull the Steri-Strips off slowly, parallel to the wound. Do not pull the strips off across the wound so you do not disturb the healing process.
Be careful when removing Steri-Strips from a wound. They can cause your skin to come off when they’re removed. Never force the Steri-Strips off because forcibly removing them could cause more damage to the healing wound. Always consult your doctor before removing Steri-Strips.
What Are the Benefits of Using Steri-Strips?
Steri-Strips provide multiple advantages for wound care, such as:
- Less Scarring: Tends to result in less visible scarring compared to sutures or staples.
- Ease of Use: Simple to apply and remove, offering convenience for minor wounds.
- Reduced Infection Risk: Their porous design allows airflow, lowering the chances of maceration and infection.
Conclusion
Steri-Strips offer a reliable alternative to stitches for minor wounds, helping to reduce scarring and minimize infection risks. By holding the skin together during healing, they are easy to apply and manage, making them a convenient choice for many patients.
Proper application is key to their effectiveness. Cleaning the wound and surrounding area, ensuring good adhesion, and following the correct placement steps can significantly improve healing outcomes.
Finally, knowing when and how to remove Steri-Strips ensures that the wound remains protected throughout the healing process. With attention to detail and care, these strips can promote faster recovery and better long-term results for small cuts and surgical incisions.
FAQs
Can I Shower or Get the Steri-Strips Wet?
Steri-Strips should stay dry for the first 24 hours after application. After this period, it’s important to continue avoiding direct water exposure while showering, as moisture can cause the butterfly bandages to loosen and reduce their effectiveness.
What Should I Do if a Steri-Strip Starts to Peel Off?
If a Steri-Strip begins to peel, carefully trim the loose edges with scissors. Do not pull on the strip, as this can disrupt wound healing and increase the risk of reopening the wound.
How Do I Remove Steri-Strips Safely?
To remove Steri-Strips, soak them in a mixture of water and hydrogen peroxide. This will help loosen the adhesive. Gently pull the strips off without applying too much pressure to avoid damaging the healing skin.
What Signs of Infection Should I Watch for After Applying Steri-Strips?
Be alert for signs of infection such as redness, swelling, increased pain, pus, or an unusual odor. If these symptoms appear or the wound does not heal, contact a healthcare provider for further evaluation.
References
www.e-firstaidsupplies.com/922-10835-p-bandages.html#.UIqEgYVcTDw
How to Care for Steri-Strips:
How to Remove Steri-Strips After Surgery


